Строка 1:
Строка 1: '''IMPORTANT:''' Immediately after the creation of the new Route from your personal account, the amount necessary to pay the installation will be debited.
'''IMPORTANT:''' Immediately after the creation of the new Route from your personal account, the amount necessary to pay the installation will be debited.
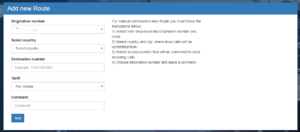
− [[File:add_route.png|thumb|Figure 1 - Manually Route Creation]]
+ [[File:add_route_en .png|thumb|Figure 1 - Manually Route Creation]]
To add a new Route, you must do the following:
To add a new Route, you must do the following:
* Select from the drop-down list the outgoing number (Caller ID)
* Select from the drop-down list the outgoing number (Caller ID)
Строка 16:
Строка 16: * Click the Add button
* Click the Add button
After that, the system will automatically offer you the Access number, which will be the local number for your Origination number.
After that, the system will automatically offer you the Access number, which will be the local number for your Origination number.
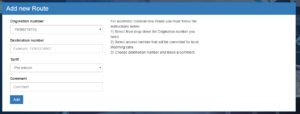
− [[File:add_route(auto).png|thumb|Figure 2 - Automatic Route Creation]]
+ [[File:add_route(auto)_en .png|thumb|Figure 2 - Automatic Route Creation]]
Версия 12:37, 19 октября 2018
Информация о сообщении (править ) Это сообщение не имеет описания. Если вы знаете, где или как это сообщение используется, то можете помочь другим переводчикам, добавив к нему описание.
Формулировка сообщения (Создание Роута )
'''ВАЖНО:''' Сразу же после создания нового Роута с вашего Лицевого Счета спишется сумма, необходимая для оплаты подключения Роута.
'''ВАЖНО:''' Сразу же после создания нового Роута с вашего Лицевого Счета спишется сумма, необходимая для оплаты подключения Роута.
[[File:add_route.png|thumb|Рис.1 - Ручное создание Роута]]
Для добавления нового Роута необходимо выполнить следующие действия:
* Выбрать из выпадающего списка необходимый Исходящий номер (АОН)
* Выбрать страну и город, откуда будут совершаться локальные звонки
* Выбрать Номер доступа, на который будут совершаться локальные звонки
* Указать Номер назначения (номер конечного абонента)
* Выбирать тип тарификации и указать комментарий
После выполнения всех вышеперечисленных действий необходимо нажать кнопку “Добавить”.
== Автоматическое создание Роута ==
Для того, чтобы воспользоваться функцией автоматического создания Роута, вам необходимо перейти на вкладку Роуты -> Автоматическое создание  и заполнить необходимые поля формы (рис. 2):
[[File:add_route(auto).png|thumb|Рис.2 - Автоматическое создание Роута]]
* Выбрать из выпадающего списка Исходящий номер (АОН)
* Ввести номер назначения
* Выбрать тип тарификации
* Ввести комментарий
* Нажать кнопку Добавить
После чего система автоматически предложит вам Номер доступа, который будет локальным номером для вашего Исходящего номера.
== Создание обратного Роута ==
Для автоматического создания обратного Роута, вам необходимо отметить пункт *Подключить обратный Роут* (рис. 3).
[[File:callback_route.png|thumb|Рис.3 - Подключение обратного Роута]]
Перевод '''IMPORTANT:''' Immediately after the creation of the new Route from your personal account, the amount necessary to pay the installation will be debited. IMPORTANT: Immediately after the creation of the new Route from your personal account, the amount necessary to pay the installation will be debited.
Figure 1 - Manually Route Creation
To add a new Route, you must do the following:
Select from the drop-down list the outgoing number (Caller ID)
Select the country and the city from which local calls will be made
Select the Access number to which local calls will be made
Specify Destination number (the number of your friend)
Select a pricing type and enter a comment
After completing all of the above, click the Add button Automatic Route Creation In order to use the automatic creation function of the Route, you need to go to the tabs Routes -> Automatic creation and fill in the necessary form fields (Figure 2):
Select from the drop-down list the Origination number (Caller ID)
Enter destination number
Select a pricing type
Enter comment
Click the Add button After that, the system will automatically offer you the Access number, which will be the local number for your Origination number.
Figure 2 - Automatic Route Creation

